https://rightlightphotography.zenfolio.com/blog Right Light Photography Peter B Campbell: Blog
https://rightlightphotography.zenfolio.com/img/s/v-12/u115413599-o965389571-50.jpg 2023-05-16T08:47:00Z (C) Right Light Photography Peter B Campbell Right Light Photography Peter B Campbell https://rightlightphotography.zenfolio.com/blog/2023/1/solo-on-the-larapinta-trail Solo on the Larapinta Trail August 2021


Why would I want to walk the Larapinta solo?

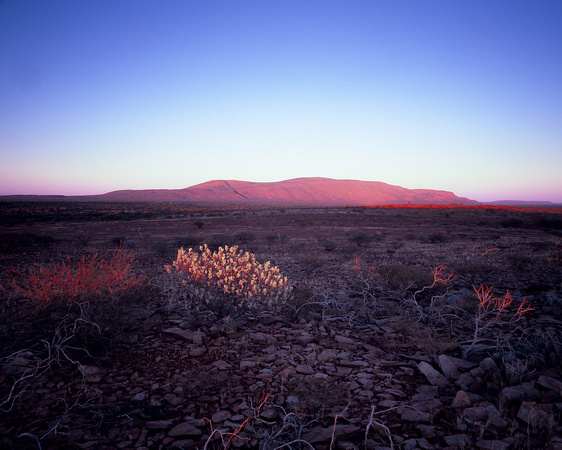
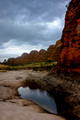
The Larapinta is an iconic trail through a beautiful part of Australia, a landscape of ghost gums, spinifex, and red rock gorges unique to Australia, - but why do it on my own?

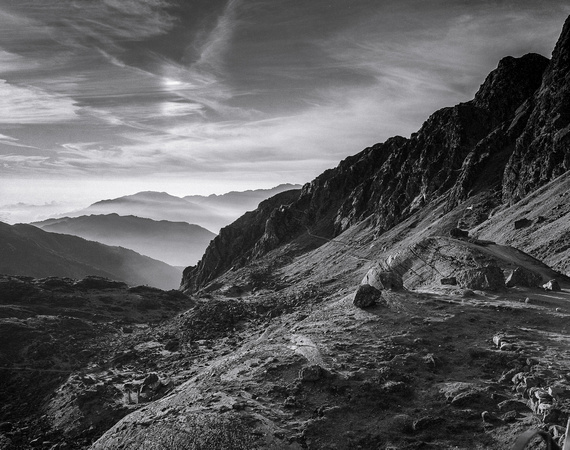
Well, I like my independence, I like to stop and rest whenever I want to, and I don’t want to be restricted to a set itinerary. Although I’m walking solo, there are other people on the trail, so I’m not totally alone. Being an enthusiastic photographer, it’s not unusual for me to stop for ½ hour or more to take photos and I can’t do this if I’m with a group. These are the main reasons; the question now is, am I fit enough? The Larapinta is a 230km trail over some very rugged country in central Australia. That wasn’t my main concern, (I’ve walked much longer distances, e.g., the Bibbulmum track, the Camino and many treks in Nepal), but I was younger! I needed to be self-sufficient on the Larapinta, and my pack at times would be 20 kilos or more and this was of some concern to me.

I booked my trip with the World Expeditions group and the logistics of the trip were handled by Australian Walking Holidays in Alice Springs. Their itinerary for solo walkers was 12 days but this was too quick for my liking. However, they were flexible, and it was no trouble to extend my itinerary to 16 days. This enabled me to break a couple of very long days into two. It also meant I would be carrying a maximum of 4 days food at any one time, which would lessen the weight as well. I started with 4 days food and had food drops placed at Standley Chasm, Ellery Creek and Ormiston Gorge. (Included in the cost of the walk.) Of course, water adds weight and at 2 overnight camps I needed 5 litres of water. (There are waterholes along the way but not all fit for drinking, so don’t rely on that)

My pack weight without food and water was about 13-14 kilos. This included all my clothes, tent, camping equipment, first aid kit and other things such as a personal locator device. (an EPIRB is a must have, especially for a solo walker)

There are permanent camp sites along the track. These all have a covered shelter with a sleeping platform, toilets and water tanks. There are campsites between the permanent camps, but if camping there, you must carry extra water. The Lrapainta Trail by John and Monica Chapman is full of information on the trail and what to carry. (Incidentally I met the author on the trail!)

I carried a Fuji X100F camera, a small,fixed lens camera that I easily carried around my neck all the time. The lens is a 35mm equivalent i.e. a slight wide angle lens. This may have some limitations, but it is small and light, - an ideal travel camera.

On the following pages are a few of my photos which may convince you to walk the trail yourself. If you would like to see more, I published a photo / travel book with Blurb called Larapinta Dreaming. Follow the link to view,

  https://au.blurb.com/b/10868505-larapinta-dreaming

Sunset BrinkleysSunset Brinkleys Moonrise Heavitree RangeMoonrise Heavitree Range                          Ghost gumGhost gum

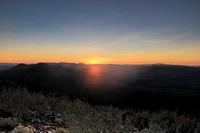
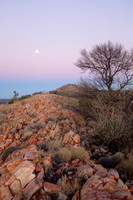
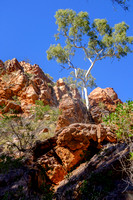
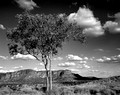
Sunset from Brinkleys                         Moonrise over Heavitree Range                    The ubiquitous "ghost" gum. 


Right Light Photography Peter B Campbell (C) Right Light Photography Peter B Campbell 2023-01-30T08:04:47Z 2023-01-30T08:04:47Z
https://rightlightphotography.zenfolio.com/blog/2020/9/mt-augustus Mt. Augustus July 2020

Mt.AugustusMt.AugustusMt.Augustus

In July 2020 I drove up to Mt. Augustus via Meekatharra, about 1000km. north of Perth. I hadn't been there before and with the covid pandamic in full swing, I thought it would be a good opportunity to go. It's about 300k from "Meeka" to Mt. Augustus on a road that is partly sealed. The gravel section is in good condition and easily done in a 2 wheel drive vehicle. I camped at the Mt. Augustus campsite for four days and my plan was to do some days walks, to the summit and of course some photography. I had several cameras with me including my "54" large format camera.

Mt. Augustus is 1100 metres above sea level, which was a surprise to me. The surrounding plain is about 700m so it's a bit deceiving. It's about twice the size of Uluru, but Uluru is a monolith and Mt.Augustus is a monocline, in geological terms that makes them different. Anyway its well worth the visit and I enjoyed my 4 day camp. For the first time I shot a roll of Provia F 120 film on my Mamiya and the accompanying photo is a scan from one of these "trannies" - an early morning shot of Mt. Augustus. (NB the length along the top of the mountain is eight kilometres.


Right Light Photography Peter B Campbell (C) Right Light Photography Peter B Campbell 2020-09-07T08:58:12Z 2020-09-07T08:58:12Z
https://rightlightphotography.zenfolio.com/blog/2020/3/langtang---helambu-trek-november-2019 Langtang - Helambu Trek November 2019

In November 2019 I went back to Nepal for the seventh time. It was remiss of me not to create a blog of my previous trips to Nepal.The Langtang and Helambu Treks can both be done as separate treks but on this occasion I combined the two treks and spent 16 days on the trail.From Syabu Besi we followed the Langtang River up the valley as far as Kyanjin Gompa and beyond to Yala Peak. On the return trip back down the valley we turned off the Langtang trail went up to the village of Thulo Syabu. From there we continued onto the Helambu Trail which took us over the Laurabina Pass via the beautiful Gosainkund lakes.

I have documented the trip in a self published book using the "Blurb" website. The book is called "Prayers in the Wind" Go to the Blurb website and have a look for yourself.

The accompanying photo is from the Gosainkund area. Near GosainkundNear GosainkundView looking back from Gosainkund. Langtang - Helambu Trek

Right Light Photography Peter B Campbell (C) Right Light Photography Peter B Campbell 2020-03-08T07:06:24Z 2020-03-08T07:06:24Z
https://rightlightphotography.zenfolio.com/blog/2017/5/bungle-bungle-trip Bungle Bungle Trip

Piccininny GorgePiccininny Gorge Piccininny Gorge#3Piccininny Gorge#3Heavy black clouds descended on Piccininny Gorge the day after my overnight camp. Chamonix 54 camera. Piccaninny Creek in the dryPiccaninny Creek in the dry Piccininny CreekPiccininny Creek Kimberley Country #2Kimberley Country #2Mamiya 7 Tmax 100.

In June 2016 I visited the Bungle Bungle. It was always on my "bucket" list of places to see and it was just a matter of organising myself to get there.I flew to Broome from Perth and hired a 4WD to get into the park. I spent a week there photographing in colour and B&W. I had 3 cameras with me, a Fuji x100s for my colour shots, a Mamiya 7 medium format camera and my latest camera, a Chamonix 54 large format camera. I used the  Mamiya and the Chamonix for B&W photography. I visited all the tourist spots, including Piccaninny Gorge, Cathedral Gorge, Echidna Chasm and Mini Palms. I also did a overnight camp deep into the Piccininny Gorge where I did all my large format photography. I had 12 sheets of 54 film so I had to pick my photos carefully. Most of the B&W shots on this website are from the 54 camera. I hope you like them.   

Right Light Photography Peter B Campbell (C) Right Light Photography Peter B Campbell 2017-05-12T09:22:33Z 2017-05-12T09:22:33Z